

If you have ever watched a yoga class, you may wonder whether your body could fold into that famous upside-down V. This downward dog stretch for beginners guide is for you. You do not need to be flexible to start. In fact, most people begin with tight hamstrings, sore wrists, and shaky arms, and that is completely normal.
Downward dog is one of the most loved stretches in the world. It lengthens the back of your legs, opens your shoulders, and wakes up your whole body. Moreover, it doubles as a gentle strength move for your arms and core.
However, the classic pose can feel uncomfortable at first. Therefore, this downward dog stretch for beginners routine breaks it down into simple steps and friendly modifications. You will learn the bent-knee version, a chair version, and wrist-pain alternatives, so you can practice with confidence from day one.
Why This Downward Dog Stretch for Beginners Guide Works
Most beginners fail at downward dog because they try the full pose too soon. In contrast, this approach starts with your comfort zone. First, you learn the basic shape with bent knees. Then, you add alignment cues one at a time.
As a result, you build strength and flexibility gradually. You will also avoid the two biggest beginner problems: wrist pain and rounded backs. Indeed, a gentler entry means you will actually keep practicing.
What downward dog stretches and strengthens
Downward dog stretches the calves, hamstrings, and the muscles along your spine. It also opens the shoulders and the back of the arms. Meanwhile, it strengthens the wrists, forearms, and core muscles that support your posture.
In addition, the pose gently turns you upside down. This shift can leave you feeling calm and refreshed. For example, many people use it as a midday reset between long hours of sitting.
Who should be careful
Most healthy adults can practice a beginner-friendly downward dog. However, skip the full pose if you have a recent wrist, shoulder, or ankle injury. In that case, use the chair version below instead.
If you are pregnant, talk with your doctor before practicing inversions. Similarly, if you have high blood pressure or glaucoma, ask a professional which modifications suit you. Safety always comes first.
How to Do the Downward Dog Stretch for Beginners Step by Step
Here is a simple breakdown you can follow today. First, grab a yoga mat or a soft carpet. Then, give yourself enough space to stretch out fully.
Step 1: Start on all fours
Place your hands under your shoulders and your knees under your hips. Spread your fingers wide, like a starfish. This wider base protects your wrists.
Press evenly through your palms, especially through the knuckles of your index fingers and thumbs. As a result, less weight dumps into the outer wrist.
Step 2: Tuck your toes and lift your hips
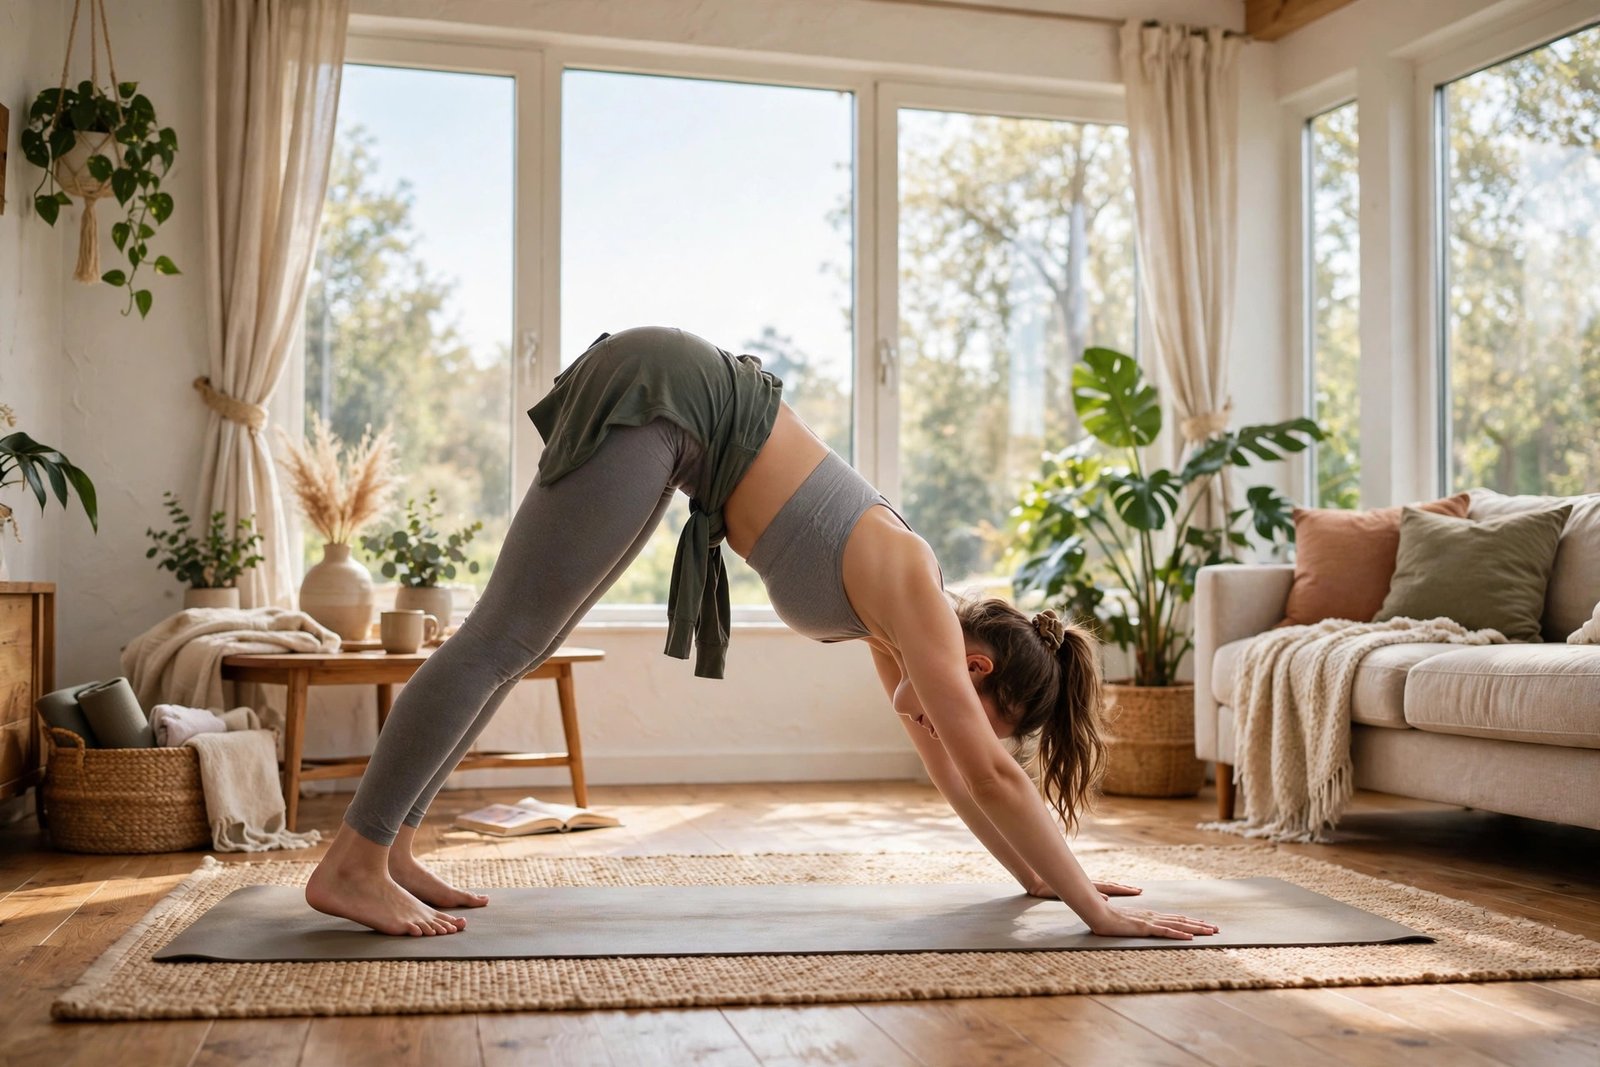
Tuck your toes under, then press into your hands as you lift your knees off the floor. Send your hips up and back toward the ceiling. Your body should look like an upside-down V.
Keep your knees generously bent. In fact, a deep knee bend is the smartest beginner choice. It lets your spine stay long instead of rounding.
Step 3: Lengthen your spine
Think of pushing the floor away with your hands while your tailbone reaches upward. This opposite pull creates length through your whole back. Meanwhile, let your head hang naturally between your arms.
Do not force your heels to the floor. For most beginners, the heels float above the mat. That is perfectly fine and will improve over time.
Step 4: Fine-tune your shoulders and neck
Roll your upper arms slightly outward and draw your shoulder blades toward your tailbone. This opens the chest and protects the neck. However, keep your neck relaxed and your gaze toward your feet or navel.
Hold the pose for 5 to 10 slow breaths. Finally, lower your knees gently to rest in child’s pose. You have just done your first downward dog.

Breathing and Alignment Cues That Make It Click
Good breathing turns a stiff pose into a smooth one. Inhale as you press the floor away, and exhale as you sink your heels back. In addition, let each exhale soften your shoulders away from your ears.
Consequently, your body will relax into the stretch instead of fighting it. Try counting your breaths: five in, five out. This rhythm keeps you calm and focused. Once you find that rhythm, this downward dog stretch for beginners session starts to feel meditative rather than mechanical.
The three alignment checks
First, check your hands: fingers spread, weight spread evenly across the palm. Second, check your spine: long and flat, not rounded like a scared cat. Third, check your knees: bent enough that your back stays straight.
If your back rounds, bend your knees more or walk your hands slightly forward. On the other hand, if the pose feels too easy, you can slowly straighten one leg at a time. Small adjustments make a big difference.
How long should you hold it
Beginners should hold for 20 to 30 seconds, which is about 5 slow breaths. Over a few weeks, build up to one full minute. Moreover, short daily holds beat one long weekly session.
Repeat the pose 2 to 3 times with a short rest between rounds. For example, you could flow between downward dog and child’s pose. This gentle rhythm builds endurance without strain.
Common Mistakes Beginners Make (and Easy Fixes)
Almost every beginner makes the same three mistakes. Fortunately, each one has a simple fix. First, people lock their knees and round their backs. The fix is simple: bend your knees deeply.
Second, people collapse into their wrists and feel sharp pain. In that case, spread your fingers wider and press through your knuckles. Third, people hold their breath and tense their shoulders. Instead, breathe slowly and melt your shoulders down.
Indeed, most discomfort in this downward dog stretch for beginners journey comes from forcing the shape. Therefore, always choose the softer option. Your body learns faster when it feels safe.
The Bent-Knee Downward Dog: Your Best Friend
The bent-knee downward dog stretch for beginners is not a lesser pose. In fact, many experienced yogis still practice this way. Bending the knees lets your hamstrings relax so your spine can lengthen properly.
To do it, follow the same steps as the classic pose but keep a generous bend in both knees. Think of your legs as shock absorbers. Meanwhile, focus on lifting your sitting bones high.
Pedal your feet by bending one knee and then the other. This gentle motion warms up the calves and hamstrings. For instance, try 10 slow pedals before holding still. It feels wonderful.
Over time, you can straighten your legs a little more. However, there is no rush. Keep the bend as long as your back needs it. Progress in flexibility comes from patience, not pushing.
The Chair-Assisted Downward Dog Stretch for Beginners
If getting down to the floor feels too hard, this downward dog stretch for beginners variation is perfect. It gives you the same back and hamstring stretch with far less effort. In addition, it is very kind to sore wrists and tight shoulders.
Use a sturdy chair that will not slide. Place it against a wall for extra safety. Then, stand facing the chair with your feet hip-width apart.
How to do chair downward dog
Place both hands on the chair seat or backrest. Walk your feet back until your body forms an L shape. Your back should be flat, like a tabletop.
Press your hips back and let your head relax between your arms. Hold for 5 to 10 breaths. Consequently, you will feel a deep stretch along your spine and the backs of your legs.
This version is wonderful for older adults, office workers, and anyone recovering from injury. Similarly, it works well as a warm-up before the floor version. Many beginners practice the chair version for weeks first.

Wrist-Pain Alternatives for Downward Dog
Wrist pain is the most common complaint among beginners. Your wrists simply are not used to bearing body weight yet. Fortunately, several downward dog stretch for beginners alternatives let you practice pain-free while your wrists get stronger.
The forearm downward dog stretch for beginners
Instead of pressing through your hands, lower onto your forearms. Place your forearms flat on the mat with elbows under your shoulders. Then, tuck your toes and lift your hips just like the classic pose.
This version removes almost all wrist pressure. In addition, it builds serious core and shoulder strength. For example, many people find they can hold this version twice as long.
Keep your neck relaxed and your spine long. If your forearms slide, place them on a folded towel or mat edge. Small props can make the pose much more comfortable.

Other wrist-friendly options
Another great option is downward dog at the wall. Stand facing a wall, place your hands on it at shoulder height, and walk back into an L shape. Meanwhile, your wrists stay in a neutral, pain-free position.
You can also try puppy pose as a gentler cousin of downward dog. Kneel on the mat, walk your hands forward, and lower your chest toward the floor. This stretches the spine and shoulders with zero wrist load.
Finally, consider wrist-strengthening exercises alongside your practice. Gentle wrist circles and palm presses build resilience over time. Indeed, stronger wrists make the full pose possible sooner.
When to rest your wrists
Sharp or pinching pain is a signal to stop immediately. In contrast, mild muscle fatigue is normal and safe. Learn to tell the difference.
If pain lingers after practice, skip weight-bearing poses for a few days. Ice and gentle stretching can help. However, see a professional if the pain does not improve within a week.
A Simple Weekly Plan for the Downward Dog Stretch for Beginners
Consistency matters more than intensity in any downward dog stretch for beginners program. Therefore, aim for short, regular sessions. Even five minutes a day will create real change within a month.
In week one, practice the chair version or bent-knee version for 3 rounds of 5 breaths. Rest in child’s pose between rounds. In addition, add gentle wrist circles before each session.
In weeks two and three, try the floor version with bent knees for 20 to 30 seconds per round. Pedal your feet to warm up. Meanwhile, keep using the forearm version on days your wrists feel tired.
By week four, most beginners can hold the classic bent-knee pose for a full minute. From there, you can slowly work on straighter legs. Remember, progress is not always a straight line, and that is okay.
Downward Dog Stretch for Beginners: Your Questions Answered
Is downward dog good for beginners?
Yes, downward dog is excellent for beginners when you use the right modifications. The bent-knee and chair versions make the pose safe and comfortable. Moreover, it stretches and strengthens many muscles at once, so it is very efficient.
Why do my wrists hurt in downward dog?
Wrist pain usually comes from weak wrists or poor weight distribution. Beginners often dump all their weight into the outer wrist. Instead, spread your fingers wide and press through your knuckles, or switch to the forearm version until your wrists strengthen.
Should my heels touch the floor?
No, your heels do not need to touch the floor. Most beginners cannot reach the floor, and forcing it rounds the back. In fact, floating heels are completely normal. Focus on a long spine first; the heels will lower over time.
How many times a day can I do downward dog?
One to two short sessions per day is plenty for beginners. For example, try a morning round and an evening round. However, stop if you feel sharp pain or unusual fatigue. Rest days help your body adapt.
Can downward dog help back pain?
Gentle downward dog can relieve mild back tightness by lengthening the spine. However, it is not a treatment for serious back conditions. If you have a herniated disc or chronic pain, check with your doctor first. Always move slowly and stop if pain increases.
What can I do instead of downward dog if it hurts?
The forearm version, chair version, and wall version are all excellent alternatives. Puppy pose is another gentle option. In addition, you can explore other stretching exercises for beginners that suit your body today.
Conclusion
Downward dog does not have to be intimidating. With bent knees, a chair, or a forearm variation, anyone can enjoy its benefits from the very first day. Indeed, the smartest beginners are the ones who modify without shame. Stick with this downward dog stretch for beginners plan, and the pose will soon feel like second nature.
Start small, breathe deeply, and practice a little each day. Over the coming weeks, you will notice longer hamstrings, calmer shoulders, and a stronger core. For a complete daily plan, try pairing this pose with our beginner daily mobility routine or these shoulder mobility exercises for pain-free movement.
So roll out your mat in your living room and give it a try. Your future self, standing taller and moving easier, will thank you. For more guidance on form and modifications, check out this beginner-friendly yoga flow guide and the classic downward-facing dog pose breakdown.
