


PNF stretching for beginners might sound like a technique reserved for physical therapists and pro athletes. In reality, it is one of the simplest ways to become more flexible at home.
The basic rhythm is easy to learn. First, you stretch gently.
Then you push lightly against resistance. Finally, you relax and stretch a little deeper.
In this guide, you will learn how the hold-relax method works. You will also get the safety rules that keep every session pain-free. In addition, you will get a five-move routine you can do solo with a wall, a chair, or a strap.
No partner is needed, and no fancy equipment is required. Let us get started.
What PNF stretching for beginners is
PNF stands for proprioceptive neuromuscular facilitation. That is a mouthful, so most trainers just call it PNF.
It began as a rehab technique for patients recovering from injuries, and physical therapists have trusted it for decades. Today, it is a mainstream flexibility method. For example, many sports teams now build it into their training rooms.
There are several PNF styles, but beginners only need one: hold-relax. It follows a simple four-step loop. First, you ease into a gentle stretch and hold it for about 10 seconds.
Second, you contract the stretched muscle at roughly 20 to 30 percent effort for 5 to 7 seconds. You simply push against something that does not move. Third, you relax completely and exhale.
Finally, you sink a little deeper into the stretch and hold for 15 to 30 seconds. Then you repeat the loop two or three times per muscle. That is the entire technique.
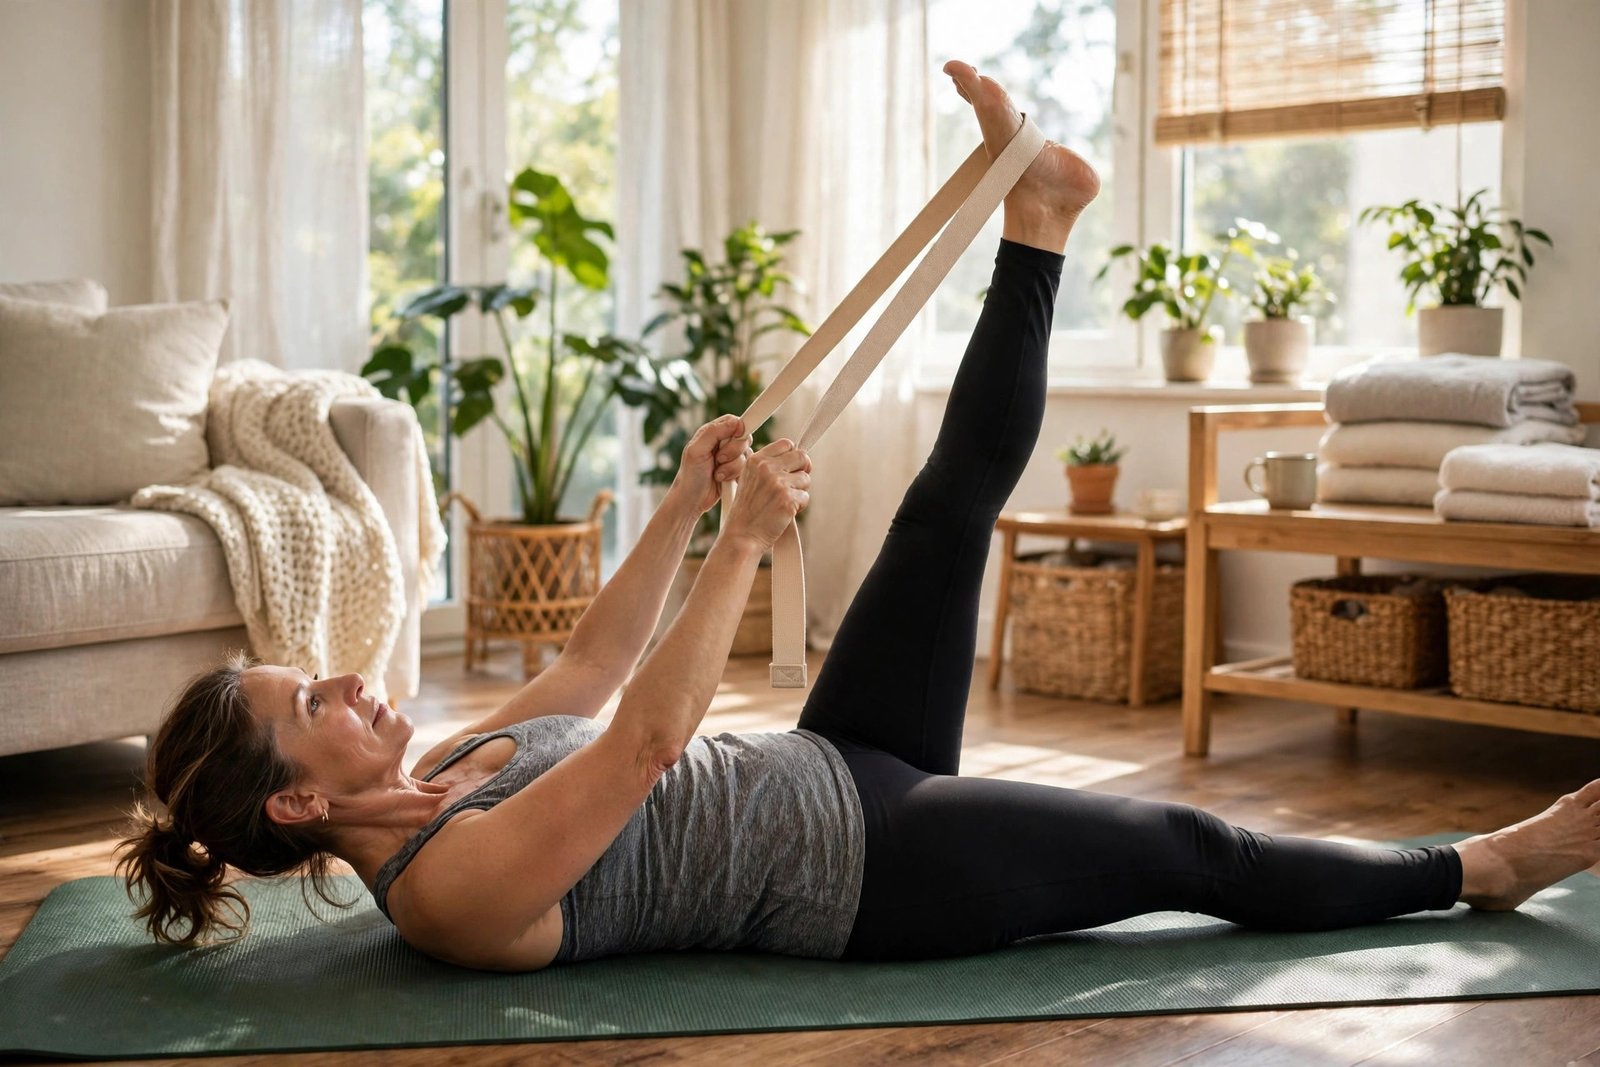
No complex choreography is involved, and no partner twists your limbs. For example, you can do a hamstring version lying on your back with a strap around your foot. Indeed, most solo versions need nothing more than a wall or a chair.
How PNF stretching for beginners works
Your muscles come with built-in safety sensors. Muscle spindles detect sudden lengthening, while Golgi tendon organs detect tension. When you contract a muscle and then release it, the Golgi tendon organs signal your spinal cord.
As a result, the cord tells the muscle that it is safe to relax. Scientists call this response autogenic inhibition.
In plain English, the short contraction resets the muscle’s tension setting. After the reset, the muscle allows a slightly deeper stretch than before. Therefore, the stretch after each contraction feels easier.
This mechanism relies on reflexes to produce deeper stretches, a principle that physical therapy clinics have documented for years (Courtney Medical Group). Moreover, tightness is often neurological, not just mechanical.
Your brain holds the brakes on a muscle it does not trust at longer lengths. The gentle contraction teaches it that the new range is safe. Consequently, the brakes loosen over several sessions and your range grows.
Why PNF stretching for beginners often beats static stretching
Static stretching still has value. Holding a gentle stretch for 30 seconds can calm you down and ease daily stiffness. However, many beginners find that static holds alone produce slow results.
The muscle resists, the mind wanders, and progress stalls. In contrast, PNF keeps you mentally engaged through every rep.

PNF adds an active ingredient: a brief, gentle contraction. Because of this contraction, you engage your nervous system in the process. In fact, comparisons of the two methods often find greater short-term range-of-motion gains with PNF.
As a result, PNF is a favorite among athletic trainers and rehab specialists (Ro).
That said, PNF does not replace static stretching. Instead, think of the two as teammates. For instance, you can use PNF for stubborn tight spots like hamstrings and hip flexors, while keeping gentle static holds for your daily wind-down.
If you want a refresher on the static side, our static stretching exercises guide covers the fundamentals in detail.
PNF stretching for beginners: 7 safety rules to follow first
PNF stretching for beginners is gentle by design. However, a little structure keeps every session safe. Follow these seven rules and you will stay comfortable and injury-free.
- First, warm up for 3 to 5 minutes. March in place, swing your arms, or do gentle bodyweight squats. Cold muscles do not like surprises.
- Second, use gentle effort only, around 20 to 30 percent of your max. You are nudging your nervous system, not arm-wrestling it. Harder contractions add risk without adding benefit.
- Third, stop if you feel sharp or pinching pain. A mild pulling sensation is normal, but pain is your body’s stop sign. Back off immediately and try a gentler range.
- Also, breathe steadily and exhale as you deepen the stretch. Holding your breath raises tension everywhere. Slow breathing tells your nervous system it is safe to let go.
- In addition, never bounce or force the deeper stretch. PNF is smooth and controlled. Jerky movements can trigger the exact stretch reflex you are trying to calm.
- Finally, skip injured or recently strained areas. If you have a joint replacement, a herniated disc, or an ongoing injury, check with your doctor or physical therapist first.
- Indeed, keep good posture during every rep. A rounded back during a hamstring stretch, for example, shifts the load onto your spine. Set up carefully, then relax into it.
These rules are simple, but they matter. In addition, beginners should start with just two or three muscles per session. You can always add more once the pattern feels automatic.
Your first PNF stretching for beginners routine: 5 solo stretches
You do not need a partner for this PNF stretching for beginners routine. Each move below uses a wall, a chair, or a strap. A belt or towel works just as well as a yoga strap.
Do two to three hold-relax cycles per stretch, resting a few breaths between cycles. As a result, the whole routine takes only about 12 to 15 minutes.
If you mostly train at home, pair this routine with our stretching exercises at home guide for a complete weekly plan.
1. Supine hamstring stretch with a strap
First, lie on your back with one leg extended flat on the floor. Loop a strap around the foot of your other leg. Then gently straighten that leg toward the ceiling until you feel a mild pull behind your thigh.
Now press your heel lightly into the strap, as if trying to push your leg back down. Use about 25 percent effort.
Meanwhile, keep your leg still and let the strap provide the resistance. Hold the contraction for 6 seconds.
Relax completely and exhale. Then gently pull the strap to bring your leg a little higher. Hold the deeper stretch for 20 seconds.
Finally, repeat the cycle two more times, then switch legs. For example, most people find the third cycle feels noticeably easier than the first.
2. Standing calf stretch at a wall
First, face a wall in a staggered stance with your hands on the wall at shoulder height. Keep your back leg straight and your heel pressed into the floor. Lean in until you feel a gentle pull in your calf.
Second, press the ball of your back foot into the floor, as if trying to push the floor away. Use light effort and do not let your body move. Hold the contraction for 6 seconds.
Relax and exhale. Then lean slightly farther into the wall and hold for 20 seconds. Finally, do three cycles per leg.
This move is excellent for runners. It also helps anyone who stands all day.

3. Chair-assisted quad stretch
First, stand behind a sturdy chair and hold its back for balance. Bend one knee and catch your ankle or pant leg with the same-side hand. Keep your knees close together and your torso tall.
Ease into a gentle stretch across the front of your thigh and hold for 10 seconds. Second, press your foot lightly into your hand, as if trying to straighten your leg. Use about 25 percent effort while your hand simply resists.
Relax and gently draw your heel a little closer to your glute. Hold for 20 seconds. Finally, repeat for three cycles, then switch sides.
For instance, if balance feels tricky, keep both hands on the chair and skip catching the foot. Simply bend the knee and press lightly instead.
4. Doorway chest opener
First, stand in a doorway and place your forearms on the frame with your elbows at shoulder height. Step one foot through the doorway until you feel a gentle stretch across your chest and shoulders. Hold for 10 seconds.
Second, press your forearms lightly into the frame, as if trying to push the doorway apart. Use easy effort and keep your body still. Hold the contraction for 6 seconds.
Relax and exhale. Then step slightly farther through the doorway and hold for 20 seconds. Finally, repeat the whole sequence three times.
This stretch is a lifesaver for desk workers with rounded shoulders. In addition, it pairs well with the quad stretch above for a full-body reset.
5. Figure-four glute stretch with a strap
First, lie on your back and cross your right ankle over your left knee. Thread a strap behind your left thigh. Then gently pull both legs toward you until you feel a deep but comfortable pull in your right glute.
Place your right hand on your right knee. Second, press the knee gently into your hand, as if opening the leg outward. Use about 25 percent effort and hold for 6 seconds.
Relax, exhale, and pull the strap to deepen the stretch. Hold for 20 seconds. Finally, do three cycles per side.
Tight glutes often limit hip mobility. Therefore, this move pays off quickly for most beginners.
How to fit PNF stretching for beginners into your week
Two to three PNF stretching for beginners sessions per week is the sweet spot. More is not automatically better, because your nervous system needs recovery time to lock in the new range. A Monday, Wednesday, Friday rhythm works well for most people.

Each session can be short. Fifteen focused minutes beats an hour of distracted stretching. In addition, you can sprinkle one or two PNF moves into your existing routine.
For instance, add the calf stretch after a walk. You could also add the doorway opener after a workday.
First, pick simple checkpoints to track. Notice how high your leg goes in the hamstring stretch. Also notice how far you can step through the doorway.
Small weekly gains add up. Consequently, many beginners report noticeably looser hips and hamstrings within three to four weeks.
Frequently asked questions about PNF stretching for beginners
These PNF stretching for beginners questions come up in nearly every class. Here are clear answers to the most common ones.
Is PNF stretching safe for beginners?
Yes, when you follow the safety rules above. The hold-relax version uses gentle contractions and smooth movements. As a result, it is one of the friendliest PNF styles to learn.
Start with low effort and skip anything painful. In addition, give your body a few sessions to learn the pattern. If you have a medical condition or an injury, check with a professional first.
How is PNF stretching different from regular static stretching?
Static stretching asks you to hold a position and wait. In contrast, PNF stretching adds a brief muscle contraction before the hold. This contraction triggers a relaxation response in the nervous system.
As a result, PNF often produces a deeper stretch in less time. Many people use both methods: PNF for stubborn tight areas and static holds for relaxation. Our static stretching exercises guide explains the static approach in full detail.
Do I need a partner to do PNF stretching?
No. A partner can help, but every stretch in this routine is designed for solo practice.
Walls, chairs, straps, and doorways make excellent substitutes. In fact, solo PNF is often better for beginners because you control the intensity completely.
How often should beginners do PNF stretching?
Two to four times per week is plenty. Your muscles and nervous system adapt between sessions, not during them. Daily PNF on the same muscle is usually overkill for beginners.
On off days, gentle movement or light static stretching keeps things loose. Moreover, rest days help the new range of motion stick.
When will I see results from PNF stretching?
Most beginners feel a difference in the very first session. The stretch after each contraction usually goes deeper right away. Lasting flexibility gains typically show up after three to four consistent weeks.
Progress depends on consistency, not intensity. Indeed, three relaxed sessions a week will beat one aggressive session every time.
Can PNF stretching help with very tight hamstrings?
Yes. Tight hamstrings are one of the most common reasons people try PNF.
The strap-assisted version in this routine is a gentle place to start. Keep the effort light and be patient.
Hamstrings that have been tight for years need weeks, not days, to change. Meanwhile, avoid aggressive toe-touch forcing, which often backfires.
Conclusion
PNF stretching for beginners comes down to one simple loop: stretch, gently push, relax, and stretch a little deeper. You do not need a partner, special equipment, or an athletic background. A wall, a chair, and a strap are enough to get started today.
Start with two or three sessions this week and keep the effort easy. Pay attention to how your body responds, and celebrate the small wins. An extra inch in your hamstring stretch is real progress.
If you are building a broader flexibility habit, our stretching exercises for beginners guide pairs perfectly with this routine. In addition, a simple weekly schedule keeps you accountable.
Stay consistent and stay gentle. Above all, enjoy the process. Your future, more mobile self is built one relaxed breath at a time.
