


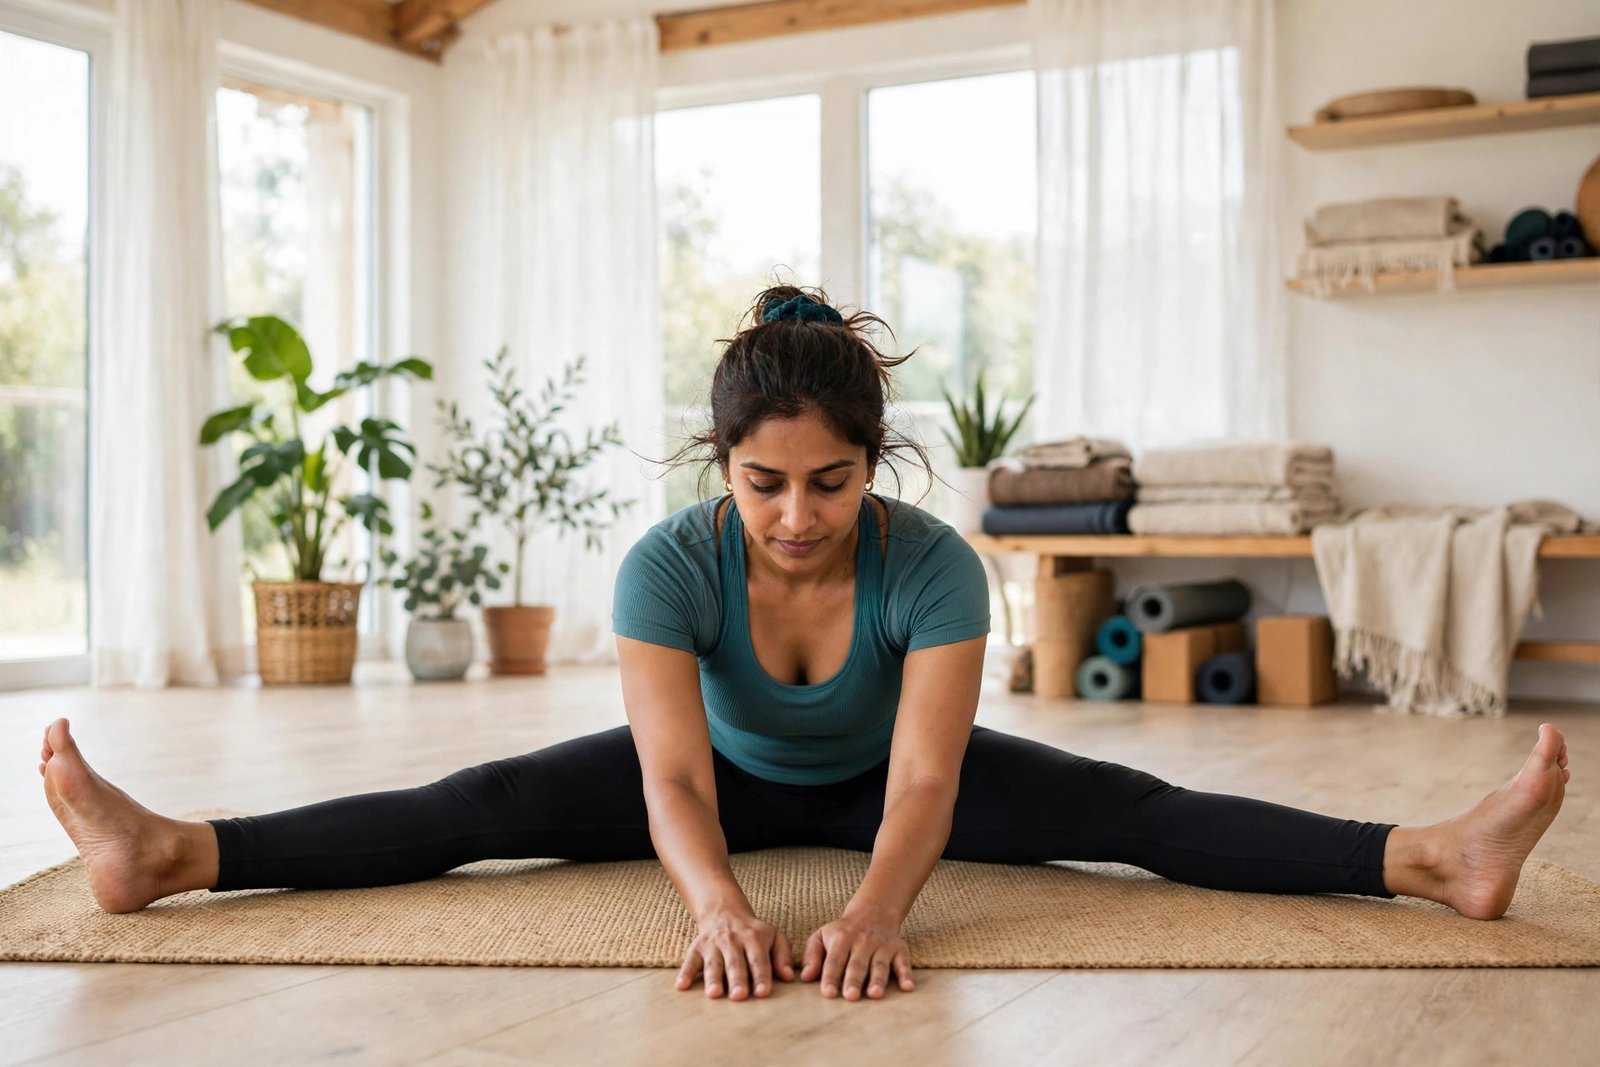
The straddle stretch looks simple. You sit down, open your legs wide, and fold forward. But if you have ever tried it, you know the truth. In addition, it can feel surprisingly hard, and the gap between what you expect and what your body allows can be humbling.
That is completely normal. It is also one of the most honest flexibility tests you will ever meet. In addition, it does not lie to you. In addition, it shows you exactly where your hips, hamstrings, and inner thighs stand today.
In fact, the good news is that this is a trainable position. With patient, consistent practice, almost anyone can make real progress in the straddle stretch. In addition, this guide will walk you through the seated form from start to finish: what muscles it works, how to do it with clean technique, the mistakes to avoid, and how to progress safely over time.
What Is the Straddle Stretch?
It is also a seated wide-leg forward fold. You sit on the floor with your legs spread apart in a V shape, then hinge forward from your hips while keeping your spine long. In yoga, this pose is often called Upavistha Konasana.
Note that the seated straddle stretch is the default form of the straddle stretch. When someone says “do a straddle stretch,” they almost always mean the seated version. There are also standing and wall-supported versions, but those are separate stretches with their own guides. Here, we will focus entirely on the seated form.
In fact, the basic shape is easy to picture. In fact, your legs form a wide V, your toes and kneecaps point toward the ceiling. Your hands rest on the floor in front of you. How far forward you fold depends on your current flexibility. Some people rest their chest on the floor. Others can barely reach past their knees. Both are fine. Also, progress in this stretch is measured over months, not days.
Muscles Worked in the Straddle Stretch
It also targets several key muscle groups at once. In fact, this is why it is such a popular drill for dancers, martial artists, gymnasts, and anyone chasing a deeper range of motion. Here is what you are actually stretching:
- Adductors (inner thighs): the main stars of this stretch. The adductor group includes the adductor longus, adductor brevis, adductor magnus, and gracilis. They run along your inner thighs and limit how wide your legs can open.
- Hamstrings: the back of your thighs gets a strong stretch, especially as you fold forward. Tight hamstrings are the number one reason beginners feel stuck in this position.
- Glutes and deep hip rotators: your gluteus maximus and smaller external rotators lengthen as the hips open. You may feel a deep pull near the sit bones.
- Calves: keeping your toes pulled toward you adds a mild calf stretch. This small detail changes how the whole position feels.
- Lower back and spinal erectors: a proper forward fold gently stretches the lower back. Just make sure the hinge comes from your hips, not from rounding your spine.
Because it works the adductors and hamstrings together, the straddle stretch is one of the best accessory drills for anyone working toward a middle split stretch. The demands overlap almost completely.
Benefits of the Straddle Stretch
It is also far more than a party trick. Practiced regularly, it delivers real, practical benefits for daily movement and athletic performance. Here are the biggest ones.
Opens the Hips
Modern life keeps our hips folded at a 90-degree angle for hours a day. In addition, it takes the hips in the opposite direction, opening them wide and restoring range of motion that sitting slowly steals. Over time, you will notice you can sit more comfortably on the floor and move your legs more freely.
Builds Hamstring and Inner Thigh Flexibility
In fact, the adductors and hamstrings are famously stubborn muscles. In addition, they respond best to consistent, patient stretching rather than occasional heroic efforts. It hits both groups at once, making it an efficient pick for anyone with tight legs from running, cycling, or desk work.
Supports Your Splits Training
You cannot reach a middle split without open adductors, and the straddle stretch is the most direct way to train them. If how to do the splits is one of your goals, this stretch deserves a permanent spot in your routine. Treat it as the foundation drill, not a side note.
May Reduce Injury Risk
Tight inner thighs and hamstrings are common contributors to groin strains, pulled muscles, and lower back discomfort. Gently increasing your range of motion over time gives these tissues more room to handle sudden movements. In fact, this is especially helpful for athletes who sprint, kick, or change direction quickly.
Encourages Relaxation
In fact, the forward fold in the straddle stretch has a calming effect for many people. Slow breathing while folded forward can lower tension and shift you into a more relaxed state. Indeed, that is why the seated straddle often shows up in evening stretching routines and cool-downs.

How to Do the Straddle Stretch: Step-by-Step
Form matters more than depth. In fact, a shallow stretch with clean form beats a deep fold with a rounded back every single time. Follow these steps:
- Find your seat. Sit on the floor or a mat with your legs extended in front of you. If your lower back rounds when you sit upright, sit on a folded blanket or cushion to lift your hips.
- Open your legs wide. Spread your legs into a comfortable V shape. Aim for roughly 90 degrees between your thighs to start. There is no need to go as wide as possible. Your legs should feel open but not strained.
- Activate your legs. Flex your feet so your toes point toward the ceiling, and let your kneecaps face straight up. Gently press your thighs down into the floor. This active engagement protects your knees and makes the stretch more effective.
- Sit tall first. Before you fold, sit as tall as you can. Imagine a string pulling the crown of your head toward the ceiling. Lengthening your spine before folding is the key detail most people skip.
- Hinge from the hips. With your back long, begin to lean your torso forward between your legs. Lead with your chest, not your chin. Walk your hands forward on the floor in front of you as you go.
- Stop at your first point of real resistance. When you feel a strong but comfortable stretch in your inner thighs or hamstrings, stop there. Your back should still be relatively flat. Hold this position and breathe.
- Breathe and relax. Take slow, deep breaths. With each exhale, see if your muscles release enough to walk your hands a tiny bit further forward. Never bounce or force your way deeper.
- Come back slowly. After 30 to 60 seconds, walk your hands back toward you and sit upright. Bring your legs together gently. Give your body a few seconds before standing up.
Form Cues That Make All the Difference
Small adjustments create big changes in this stretch. Also, keep these cues in mind every time you practice:
- Toes and kneecaps to the sky. When your kneecaps roll inward, the stretch shifts away from the adductors and into the knee joint. Keep everything pointing up to protect your knees.
- Thighs press down. Lightly engage your quadriceps and press the backs of your thighs toward the floor. This keeps the legs active instead of floppy.
- Chest leads, chin follows. Aim your sternum toward the floor between your legs. If your chin reaches forward first, you are rounding your neck and upper back.
- Breathe into the stretch. Deep belly breaths tell your nervous system that the position is safe. Shallow, held breaths do the opposite. If you cannot breathe easily, you have gone too far.
- Use the wall behind you. Sitting with your back against a wall helps you feel whether your spine stays tall as you fold. This is a simple way to check your form.
Common Mistakes to Avoid
In addition, these mistakes are extremely common, especially among beginners. Watch out for them:
Rounding the Lower Back
The single biggest error in the straddle stretch is folding by rounding the spine instead of hinging at the hips. A rounded back shifts the stretch away from the inner thighs and loads the lower back instead. If you notice your back curving, sit taller, narrow your legs slightly, or elevate your hips on a cushion.
Chasing Depth Too Fast
Seeing advanced stretchers fold their chest flat to the floor can make your own progress feel small. Resist the urge to compare. Forcing depth before your body is ready is the fastest way to strain an adductor or hamstring. Flexibility is built in millimeters per month, not inches per week.
Bouncing Into the Stretch
Bouncing, also called ballistic stretching, tricks the stretch reflex into firing. Your muscles contract defensively instead of relaxing, which can actually reduce your range of motion and raise injury risk. Hold still and breathe instead.
Letting the Knees Cave Inward
When the legs get tired, the kneecaps tend to roll inward. In addition, this twists the knee joint under load, which is not a good combination. If you cannot keep your knees pointing up, bring your legs a little closer together.
Holding Your Breath
Breath-holding increases tension everywhere, which is the exact opposite of what you want during a stretch. If you catch yourself holding your breath, back off to a shallower position where you can breathe freely.

Beginner Modifications
If the basic straddle stretch feels impossible right now, that is fine. In addition, these modifications meet you where you are:
Sit on a Cushion or Folded Blanket
Elevating your hips makes it easier to sit tall with a flat back. In addition, this one change solves the rounding problem for most beginners. Also, use a firm cushion or a folded yoga blanket, not something so thick that you feel unstable.
Support Yourself With Your Hands
Also, place your hands on the floor behind you, just beside your hips. Then, press gently into the floor to lift your torso taller. This takes pressure off your tight hamstrings and lets you sit upright without struggling.
Narrow Your Leg Spread
You do not need a wide split to get benefits. In fact, a narrower V still stretches the adductors and hamstrings, just less intensely. Widen the angle gradually over weeks as your body opens up.
Try the Wall-Assisted Version
Lying on your back with your legs resting up the wall lets gravity do the work. In fact, your back stays flat, and the adductors still get stretched. Our wall-assisted straddle variation guide covers this version in detail.
Progressions: Deepen Your Straddle Stretch
Once the basic position feels comfortable, you can start working deeper. Also, add these progressions one at a time:
- Widen the V gradually. Every week or two, try opening your legs a couple of inches wider. Small jumps add up. There is no prize for going from 90 degrees to 150 degrees in one session.
- Fold lower over time. Start by holding at 45 degrees, then work toward forearms on the floor, and eventually chest to floor. Let depth come to you through relaxation, not force.
- Add side bends. From your straddle position, reach one arm overhead and bend your torso sideways toward the opposite leg. This adds an oblique and lat stretch. Healthline describes a seated side stretch tutorial as a useful companion drill for the torso and hips.
- Walk your hands side to side. Instead of folding straight down the middle, walk your hands toward one foot, hold, then walk toward the other foot. This gives each inner thigh a focused stretch.
- Practice active holds. At your end range, try pressing your legs gently into the floor for 10 seconds, then release and relax a little deeper. This contract-relax technique teaches your nervous system that the position is safe.

How to Program the Straddle Stretch
Knowing the stretch is only half the battle. Here is how to fit it into your week for steady progress:
Warm Up First
Never stretch cold. Also, spend 5 to 10 minutes walking, jogging in place, or doing light dynamic movements before your straddle work. Warm muscles stretch more easily and with less risk.
Frequency and Duration
For noticeable progress, practice 3 to 5 times per week. Also, hold each fold for 30 to 60 seconds and repeat 2 to 3 rounds. Daily practice is fine as long as you keep the intensity moderate and never stretch through sharp pain.
Sample 10-Minute Session
- 2 minutes: light warm-up (marching in place, leg swings, hip circles).
- 3 minutes: seated straddle, medium intensity. Sit tall, fold halfway, hold 60 seconds, rest 30 seconds, repeat twice.
- 3 minutes: side-to-side work. Walk hands toward each leg, holding 30 seconds per side, two rounds.
- 2 minutes: easy forward fold at comfortable depth. Focus on slow breathing and relaxation.
Pair It With Strength Work
Flexibility lasts longer when you pair it with strength. Wide-stance squats, side lunges, and glute bridges strengthen the muscles you are stretching. Strong and flexible beats just flexible every time.
Brief Look at Other Straddle Variations
In addition, this guide covers the seated straddle stretch, but you may come across two close relatives. In fact, the standing straddle stretch folds forward from a wide standing position and is more of a hamstring and adductor drill with balance demands. The wall-assisted version lets you relax on your back while the wall holds your legs open.
Both have their own full guides because the form details and safety notes are different enough to deserve separate treatment. Stick with the seated version until it feels comfortable, then explore the variations.
Safety Tips
Stretching should never hurt. Then, keep these safety basics in mind every session. Also, stop immediately if you feel sharp, stabbing, or shooting pain, especially near the groin or behind the knee.
Back off if you feel a pinching sensation in the front of your hips. In addition, this can signal that the hip joint, not the muscle, is hitting its limit. Slightly tucking your tailbone or narrowing your leg spread usually resolves it.
Be extra cautious if you are hypermobile, pregnant, or recovering from a groin or hamstring injury. In these cases, shorter holds and shallower positions are smarter. When in doubt, check with a qualified professional before pushing your range.
Frequently Asked Questions
Is the seated straddle stretch the same as the straddle stretch?
Yes. In fact, the seated version is the default form of the straddle stretch. When most people say “straddle stretch,” they mean sitting on the floor with legs spread wide and folding forward. In fact, the seated straddle stretch keyword simply names that same position more precisely.
How long does it take to get a flat straddle stretch?
In addition, it depends on your starting point, age, and consistency. Beginners practicing 3 to 5 times per week often see meaningful progress in 3 to 6 months. Reaching a chest-to-floor fold can take a year or more. Genetics and hip structure play a role, so focus on your own progress rather than someone else’s timeline.
How often should I do the straddle stretch?
Three to five sessions per week is a solid target. Also, hold each stretch for 30 to 60 seconds and do 2 to 3 rounds per session. Consistency matters far more than marathon sessions. In fact, ten minutes of regular practice beats one hour once a month.
Why do I feel the straddle stretch in my lower back instead of my legs?
This usually means you are rounding your spine instead of hinging at the hips. Also, sit on a cushion to elevate your hips, narrow your leg spread, and focus on keeping your chest lifted as you fold. In fact, the stretch should live in your inner thighs and hamstrings.
Can beginners do the straddle stretch?
Absolutely. Beginners just need the right modifications: sit on a folded blanket, keep the legs narrower, and support yourself with your hands. In fact, the position scales to every level. Also, start gentle, practice often, and widen the angle over time.
Should the straddle stretch be painful?
No. You should also feel a strong pull or mild discomfort in the inner thighs or hamstrings, never sharp or stabbing pain. Pain is your body’s signal to back off. Stretch to about a 6 or 7 out of 10 in intensity, where you can still breathe deeply and relax.
Does the straddle stretch help with the splits?
Yes, it is one of the most useful drills for the middle split. Both demand open adductors and mobile hips. Regular straddle practice builds the exact range of motion the middle split requires, making it an essential part of any splits program.
Conclusion
It is also simple, humbling, and incredibly effective. In addition, it asks for nothing more than a patch of floor and a few patient minutes. In return, it opens your hips, lengthens your inner thighs and hamstrings, and builds the foundation for deeper flexibility goals like the middle split.
Remember the basics: sit tall, hinge from the hips, keep your knees and toes pointing up, and breathe. Skip the bouncing, respect the pain signals, and let depth arrive on its own schedule. Also, progress in this stretch is measured in months, and every month of consistent practice counts.
Then, add the straddle stretch to your routine three to five times per week, and check back in a few months. Your body will surprise you. Simple movement, practiced often, really does lead to better living.
